Gas Regulator & Valve Cleaning
Understanding Gas Regulators and Valves
What Are Gas Regulators and Valves?
Types of Gas Regulators and Valves
Several types of regulators and valves serve distinct purposes:
- Pressure Regulators: These are categorized as single-stage or dual-stage. Single-stage regulators reduce pressure in one step, suitable for applications with stable input pressures, such as propane grills. Dual-stage regulators, which reduce pressure in two steps, offer greater precision and are used in sensitive applications like medical oxygen systems or laboratory equipment.
- Control Valves: These include globe, ball, and gate valves, each designed for specific flow control needs. Globe valves provide precise flow modulation, often used in industrial processes. Ball valves, known for their quick on/off action, are common in pipelines. Gate valves, typically used in fully open or closed positions, are prevalent in natural gas distribution systems.
- Safety Valves: These are critical for preventing system failures by releasing excess pressure. Found in high-pressure systems like boilers or compressed gas cylinders, safety valves automatically vent gas when pressure exceeds safe limits, protecting equipment and personnel.
Applications Across Industries
The Importance of Maintenance
Why Cleaning is Essential
The Impact of Contaminants on Performance
Safety Risks of Neglected Cleaning
Preserving Equipment Longevity
Ensuring Regulatory Compliance
The Benefits of Routine Cleaning
Safety Precautions Before Cleaning
Cleaning gas regulators and valves is a critical maintenance task to ensure their performance and longevity in systems handling gases. However, these components often operate in high-pressure or hazardous environments, making safety precautions vital during cleaning. Improper handling can lead to gas leaks, injuries, equipment damage, or environmental hazards.

1. System Shutdown and Depressurization
2. Personal Protective Equipment (PPE)
3. Ensure Proper Ventilation
4. Use Non-Sparking Tools
5. Follow Manufacturer Guidelines
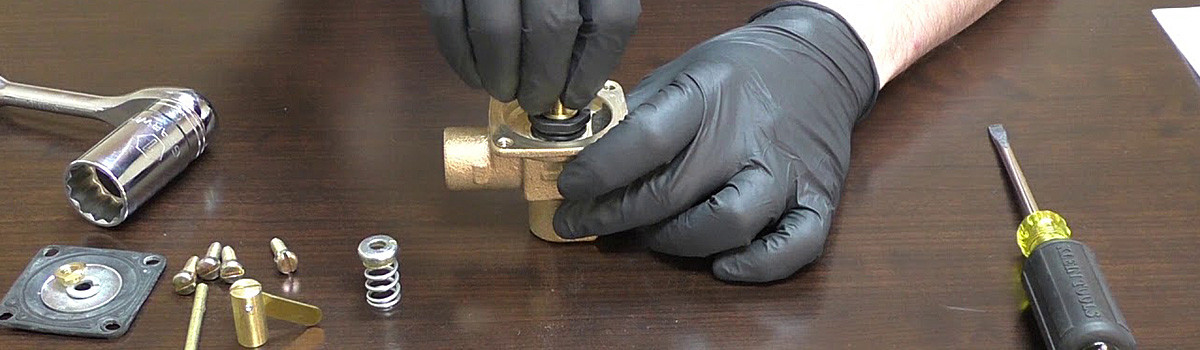
Step-by-Step Cleaning Process
- Non-sparking wrenches and screwdrivers
- Soft-bristle brushes (nylon or brass)
- Approved cleaning solvents (e.g., isopropyl alcohol, degreasers)
- Compressed air or nitrogen
- Lint-free cloths
- Ultrasonic cleaner (optional for industrial settings)
- Replacement O-rings or gaskets (if needed)
- Lubricants (manufacturer-approved, if applicable)
- Ensure the system is depressurized and isolated.
- Remove the regulator or valve from the system using appropriate tools. For regulators, detach from the gas cylinder or pipeline. For valves, isolate from the piping.
- Disassemble components carefully, noting the order of parts (take photos if needed). Remove O-rings, diaphragms, or seats as per the manual.
- Examine components for visible damage, corrosion, or wear. Look for cracks in metal parts, degraded seals, or stuck mechanisms.
- Identify areas with heavy contamination, such as grease buildup or particulate matter.
- Manual Cleaning: Use a soft-bristle brush and lint-free cloth with an approved solvent to remove dirt, grease, or rust. For example, isopropyl alcohol is effective for general cleaning, while specialized degreasers may be needed for heavy oil buildup.
- Ultrasonic Cleaning: For precision components, use an ultrasonic cleaner with a compatible cleaning solution. This method is ideal for removing stubborn contaminants without abrasive scrubbing.
- Compressed Air: Blow out debris from hard-to-reach areas using compressed air or nitrogen. Ensure low pressure to avoid damaging delicate parts.
- Avoid harsh chemicals like bleach or acidic cleaners unless specified by the manufacturer, as they can corrode metal or degrade seals.
- Rinse components with clean water or a neutralizing solution if required by the solvent used.
- Dry thoroughly with compressed air or lint-free cloths to prevent moisture-related corrosion.
- Re-inspect components for residual contaminants or damage. Replace worn O-rings, gaskets, or seals if necessary.
- Reassemble the regulator or valve in the correct order, applying manufacturer-approved lubricants to moving parts if recommended.
- Torque bolts to the specified settings to avoid over-tightening.
- Reinstall the regulator or valve into the system.
- Gradually repressurize the system and check for leaks using a soap solution or a gas leak detector.
- Test the device’s performance to ensure proper pressure regulation or flow control.
Best Practices and Maintenance Tips
- Establish a Maintenance Schedule: Clean regulators and valves at regular intervals based on usage and environmental conditions. High-dust or humid environments may require monthly cleaning, while less demanding settings might need annual maintenance.
- Use Approved Cleaning Agents: Always use solvents and lubricants recommended by the manufacturer to avoid material degradation. For example, oxygen-compatible cleaners are critical for medical or welding regulators to prevent combustion risks.
- Avoid Common Mistakes:
- Don’t use excessive force when disassembling or reassembling, as this can damage threads or seals.
- Avoid abrasive tools like steel wool, which can scratch surfaces and promote corrosion.
- Never reuse damaged O-rings or gaskets, as they are prone to leaks.
- Monitor Environmental Factors: Store regulators and valves in dry, clean areas to minimize contamination between cleanings.
- Keep Records: Document cleaning dates, observations, and replaced parts to track maintenance history and predict future needs.
- Know When to Replace: If components show significant wear, corrosion, or damage that cleaning can’t resolve, replace them to ensure safety and performance.
Challenges and Troubleshooting
Cleaning gas regulators and valves is essential for maintaining their performance and safety, but the process can present challenges, particularly with older or heavily contaminated equipment. Issues such as stubborn contaminants, corrosion, stuck components, and persistent leaks require careful troubleshooting to ensure effective cleaning without compromising the system.
1. Tackling Stubborn Contaminants
One of the most frequent challenges in cleaning gas regulators and valves is dealing with heavy grease, oil, or carbon buildup. These contaminants can accumulate in high-use systems, such as those in industrial manufacturing or welding, and may resist standard cleaning methods. To address this, multiple cleaning cycles using specialized solvents, such as industrial degreasers, may be necessary. Soaking affected parts in a degreaser overnight can loosen stubborn deposits, making them easier to remove. Ensure the solvent is compatible with the equipment’s materials, as outlined in the manufacturer’s guidelines, to avoid damage. Thorough rinsing and drying after cleaning prevent residual chemicals from affecting performance.
2. Addressing Corrosion
Corrosion is a common issue, especially in older regulators or valves exposed to moisture or corrosive gases. Light rust can often be treated with a mild acid-based cleaner, such as vinegar or a commercial rust remover, provided it is approved for use by the manufacturer. Apply the cleaner carefully, following safety protocols, and rinse thoroughly to remove all traces of the solution. However, severe corrosion, such as pitting or structural damage, typically indicates that the affected component is compromised and requires replacement. Attempting to clean heavily corroded parts may weaken them further, risking leaks or system failure. Regular inspections can help identify corrosion early, preventing costly repairs.
3. Handling Stuck Components
Seized or stuck components, such as valve stems or regulator fittings, are another challenge, often caused by prolonged exposure to contaminants or lack of maintenance. To free stuck parts, apply a penetrating lubricant designed for industrial use and allow it to soak for the recommended time. Gently tap the component with a non-sparking tool, such as a brass or plastic mallet, to loosen it without causing damage. Avoid using excessive force, as this can crack or deform delicate parts, leading to costly repairs or replacements. If the component remains stuck, consult a professional technician to avoid compromising the system’s integrity.
4. Resolving Persistent Leaks Post-Cleaning
After cleaning, some systems may exhibit persistent leaks, indicating issues with seals, connections, or internal components. Begin by rechecking all seals and fittings to ensure they are properly seated and undamaged. Replace any worn or cracked seals, as these are common culprits. If leaks persist, the issue may stem from internal damage, such as cracks in the regulator body or valve seat, which may not be visible. In such cases, consult a professional technician or manufacturer support for a thorough inspection. Attempting to force a repair without expertise can exacerbate the problem, leading to safety hazards.
Conclusion