Regulator Manufacturer Tel: +86 13380377051
Regulator Manufacturer Tel: +86 13380377051
")
How to Test an Acetylene Gas Pressure Regulator for Leaks
In the world of oxy-fuel welding and cutting, acetylene gas is an indispensable fuel, prized for its intense flame temperature. However, its unique properties—it is unstable under pressure, highly flammable, and forms explosive mixtures with air—make handling it a task demanding utmost respect and caution. At the heart of safe acetylene usage lies the pressure regulator, a device that reduces high cylinder pressure to a safe, workable level. A leaking regulator isn’t just a waste of gas; it’s a severe safety hazard capable of causing fire, explosion, and poisoning.
This article provides a comprehensive, step-by-step guide on how to safely test an acetylene gas pressure regulator for leaks. We will emphasize methods that prioritize safety above all else, outlining the tools, preparations, and specific techniques used by professionals to ensure system integrity before every use.
Part 1: Understanding the Risks and the Regulator
Why Acetylene is Particularly Dangerous
Unlike other fuel gases, acetylene is dissolved in acetone and stored in a porous mass within the cylinder to stabilize it. It becomes unstable and can undergo decomposition at pressures above 15 psi (1 bar) if free in a line. A leak, therefore, isn’t just about gas escape; it’s about creating an unseen, highly flammable cloud that can be ignited by a single spark, static electricity, or even the heat from a nearby operation. Furthermore, acetylene displaces oxygen, creating an asphyxiation risk in confined spaces.
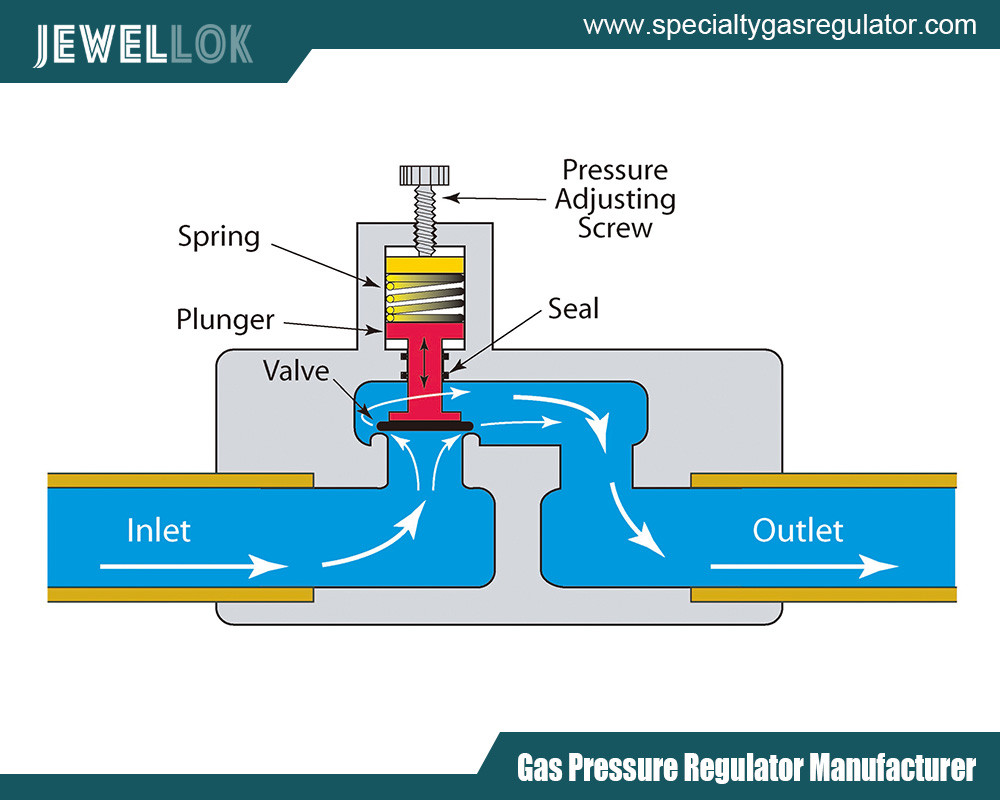
Regulator Anatomy: Key Leak Points
Knowing where to look is half the battle. The primary leak points on an acetylene gas pressure regulator system are:
- Cylinder Valve Seat: The seal where the cylinder valve itself contacts the valve seat inside the cylinder.
- Regulator Inlet Connection (Cylinder Nut): The threaded connection between the regulator and the cylinder valve.
- Regulator Diaphragm/Housing: The main body seal and the flexible diaphragm that controls pressure.
- Regulator Outlet Connection (Hose Barb): The connection point for the fuel hose.
- Pressure Gauges: The seals where the high-pressure (cylinder pressure) and low-pressure (working pressure) gauges screw into the regulator body.
- Vent Hole/Relief Device: Most acetylene regulators have a safety relief device or a small vent hole. A continuous, significant leak here indicates a ruptured diaphragm—a critical failure.
Part 2: Essential Safety Preparation
Never use a flame or “listen and feel” methods to check for acetylene leaks. The following preparations are mandatory.
Personal Protective Equipment (PPE)
- Safety Glasses or Goggles: Always worn when handling cylinders and regulators.
- Fire-Resistant Gloves: Protect hands during connection/disconnection.
- Appropriate Clothing: Wear flame-resistant clothing; avoid synthetic materials that can melt.
Workspace Preparation
- Well-Ventilated Area: Perform leak testing outdoors or in a shop with excellent cross-ventilation. Never test in a confined space.
- Ignition Source-Free Zone: Ensure no open flames, sparks, grinding operations, or hot surfaces are within 20 feet. Prohibit smoking.
- Fire Safety: Have a suitable Class B (flammable liquids/gases) fire extinguisher readily accessible.
- Secure the Cylinder: The acetylene cylinder must be securely chained or strapped to a stable cart or wall bracket to prevent tipping.
Tools and Materials Needed
- Leak Detection Solution: Commercial “Snoop” or equivalent leak detection fluid is ideal. A properly mixed soap solution (see warning below) is an acceptable alternative.
- ⚠️ WARNING: Do not use household soaps, detergents, or washing-up liquid. These often contain moisturizers and additives that can be corrosive to brass fittings and regulator internals. Use only pure liquid soap or a commercial leak detection fluid.
- Two Adjustable Wrenches (Correct Size): For making and tightening connections properly, preventing damage to nuts and fittings.
- Clean, Dry Cloth: For wiping fittings dry before and after testing.
Part 3: Step-by-Step Safe Testing Procedure
Follow this sequence before every use and whenever a cylinder is changed or the system is disturbed.
Step 1: Initial Connection & “Bumping” the Valve
- Inspect: Visually inspect the cylinder valve outlet, regulator inlet, and hose for dirt, oil, grease, or damage. Acetylene and oil are a violent explosive combination. If contaminated, do not use; tag the equipment and contact your gas supplier.
- Crack the Valve: With the regulator pressure-adjusting screw fully turned out (counter-clockwise) so it exerts no pressure on the diaphragm, stand to the side of the cylinder (not in front of the gauges). Briefly open and immediately close the cylinder valve (“crack” it) for one second to clear any dust or debris from the valve outlet. This prevents contaminants from entering the regulator.
- Connect the Regulator: Hand-tighten the regulator inlet nut onto the cylinder valve. Use two wrenches—one to hold the cylinder valve square and the other to tighten the regulator nut—to avoid twisting the regulator. Follow the regulator manufacturer’s torque specification if available; otherwise, tighten firmly but avoid excessive force that can damage threads.
Step 2: The Primary Leak Test (Cylinder Valve to Regulator)
This test checks the main seal between the cylinder and the regulator.
- Close the Outlet: Ensure the torch valves are closed. The regulator outlet should be open (hose connected) or capped if no hose is attached.
- Slowly Open Cylinder Valve: Open the acetylene cylinder valve no more than one full turn, and always leave the cylinder wrench in place on the valve stem so it can be shut off instantly in an emergency.
- Observe the High-Pressure Gauge: It will rise to indicate the cylinder pressure (e.g., 225 psi when full). Note the reading.
- Close Cylinder Valve: Immediately after noting the pressure, close the cylinder valve tightly.
- Monitor for Pressure Drop: Watch the high-pressure gauge for at least one minute, but preferably two to three. A stable needle indicates no significant leak at the primary connection or the cylinder valve seat. If the needle drops, you have a leak. Proceed to pinpoint it with solution.
Step 3: Applying Leak Detection Solution
This is the definitive test to locate the exact source of any leak.
- Prepare the Solution: Apply commercial leak detector or your safe soap solution to a small brush or spray bottle.
- Apply to All Fittings: With the cylinder valve CLOSED and pressure in the regulator, liberally apply the solution to:
- The connection between the cylinder valve and the regulator inlet nut.
- The regulator body seams and the vent hole.
- Both gauge glass connections.
- The regulator outlet connection (hose barb/nut).
- Do not apply solution directly to the cylinder valve stem packing nut. If this area leaks, tag the cylinder and contact your supplier—do not attempt to fix it yourself.
- Observe for Bubbles: Look closely at each coated area. The formation of a growing, persistent bubble cluster indicates a leak. A few tiny bubbles that do not grow may be residual air trapped in the solution; wipe and reapply to confirm.
- Small, slow bubble: A minor leak that needs correction.
- Rapid stream of bubbles or a large frothy mass: A significant, dangerous leak.
Step 4: Testing the Regulator Internals and Outlet
This checks the regulator diaphragm and outlet seal.
- Pressurize the Low-Pressure Side: With the cylinder valve open, slowly turn the regulator pressure-adjusting screw clockwise to introduce a low working pressure (e.g., 5-10 psi) into the hose and torch.
- Test for Internal/Outlet Leaks: Apply leak detection solution to the regulator vent hole and the hose connection at the regulator outlet.
- Vent Hole Bubbling: This is a critical failure indicating a ruptured diaphragm. Shut the cylinder valve immediately. The regulator must be taken out of service and rebuilt by a qualified technician or replaced.
- Outlet Connection Bubbling: Indicates a poor hose connection. Depressurize, disconnect, inspect the hose nipple, and reconnect properly.
- Close Cylinder Valve & Monitor Both Gauges: With low pressure set, close the cylinder valve. Watch both the high-pressure and low-pressure gauges for several minutes.
- A drop in the high-pressure gauge with the cylinder valve closed confirms a leak upstream of the regulator seat (likely the connection you tested in Step 2).
- A drop in the low-pressure gauge indicates a leak downstream: the regulator seat, the diaphragm (if the vent isn’t bubbling), the hose, torch valves, or fittings.
Step 5: Full System Test
Once the regulator itself is confirmed leak-free, perform a final check on the entire system with the torch connected (torch valves closed). Open the cylinder valve and set working pressure. Apply leak detection solution to all hose connections, the torch inlet, and the torch valve stems. Correct any leaks found before igniting the torch.
Part 4: What to Do If You Find a Leak
- STOP. Do Not Ignite Anything.
- Shut the Source: Immediately close the acetylene cylinder valve.
- Vent Safely: In a well-ventilated area, slowly open the torch valve to vent pressure from the system. Turn the regulator adjusting screw out fully.
- Correct the Issue:
- Loose Connection: Depressurize, disconnect, inspect threads for damage, re-make the connection properly with two wrenches, and re-test.
- Faulty Regulator (Vent Hole Leak, Internal Leak): Tag it “DEFECTIVE – DO NOT USE” and remove it from service. Send it for professional repair or replace it.
- Damaged Hose/Fittings: Replace them with components rated for acetylene service (usually red hose with left-hand threaded fittings).
- Re-test: After any correction, repeat the entire leak testing procedure from the beginning.
Part 5: Proactive Maintenance and Best Practices
- Daily/Pre-Use Checks: The procedure above should be a non-negotiable pre-operation ritual.
- Annual Professional Inspection: Have regulators, torches, and hoses inspected and serviced by qualified personnel annually, or as per the manufacturer’s schedule.
- Proper Storage: When not in use for extended periods, close cylinder valves, bleed the system, and back off regulator adjusting screws fully.
- Use Correct Equipment: Only use equipment designed and labeled for acetylene service. Never use oxygen regulators, hoses, or fittings for acetylene.
- Trust Your Nose: While not a test method, acetylene has a distinct garlic-like odor added to it. If you smell gas strongly, it is an urgent warning sign.

Conclusion
Testing an acetylene gas pressure regulator for leaks is not a mere suggestion—it is a fundamental pillar of workshop safety. The consequences of negligence are simply too grave. By understanding the risks, meticulously preparing your workspace, and systematically applying safe leak detection methods—primarily the use of a proper leak detection solution on a pressurized, non-ignited system—you transform a hazardous procedure into a controlled one.
Make these safe testing methods an ingrained habit. Your vigilance is the most critical safety device on the system, ensuring that the powerful tool of oxy-acetylene remains a source of productivity, not peril. Remember: when working with acetylene, there is no such thing as being too safe.
For more about how to test an acetylene gas pressure regulator for leaks, you can pay a visit to Jewellok at https://www.specialtygasregulator.com/product-category/specialty-gas-cabinet/ for more info.
-

High Purity Configurable Systems VMB Valve Manifold Box JW-200-VMB-C & JW-100-VMB-C
-

High Pressure High-Purity Welded Check Valves And Low Cracking Pressure Check Valve JCV1 Series
-

772L Male Branch Tee | Stainless Steel High-Purity Tube Fitting Male Branch Tee
-

High-Efficiency Exhaust Gas Scrubber System for Semiconductor and Photovoltaic Hazardous Gas Abatement Solutions
-
High Purity Bulk Specialty Gas Pressure Control And Filtration Bulk Gas Skid Systems JW-300-BSGS
-

Stainless Steel Low Pressure Seal Pneumatic Diaphragm Control Valve For For HP & UHP Gases
-

Semi Automatic Gas Cabinet Systems for Handling Toxic and Flammable Process Specialty Gases in High Tech
-

316L Stainless Steel Tube Butt Weld Reducing Fittings Union Reducer RW Series Ultrahigh Purity Process